MSA의 API Gateway 패턴 개념 잡기
예전에 조대협님의 블로그에 실린 마이크로 서비스 아키텍처의 이해(MSA의 이해) 글을 읽어보고, MSA에 대해서 관심을 가진 적이 있었다. 하지만 MSA에 대해서 약간의 개념 지식만 있을 뿐, 실제 어떻게 구현하는지에 대해서는 자세히 알지 못했다. 그런데 최근에 시간이 남아서(…Looking for new job…ㅜㅜ), Spring 관련 프로젝트들의 튜토리얼을 따라하고 테스트해보다가, Spring Security and Angular JS를 보게 되었는데 Spring-cloud를 사용해서 reverse proxy 역할을 하는 API Gateway를 쉽게 만들고, 그 뒤(Back-end)에 서로 다른 역할을 하는 여러 개의 애플리케이션을 만드는 내용이 있어서 잊어버리기 전에 간단하게 정리를 해보려고 한다.
여기에서 정리하는 내용은 위 레퍼런스의 Part VI. Multiple UI Applications and a Gateway에 해당되는 내용이다.
위의 레퍼런스에도 나와있듯이 만들어보고자 하는 아키텍쳐는 아래와 같다.
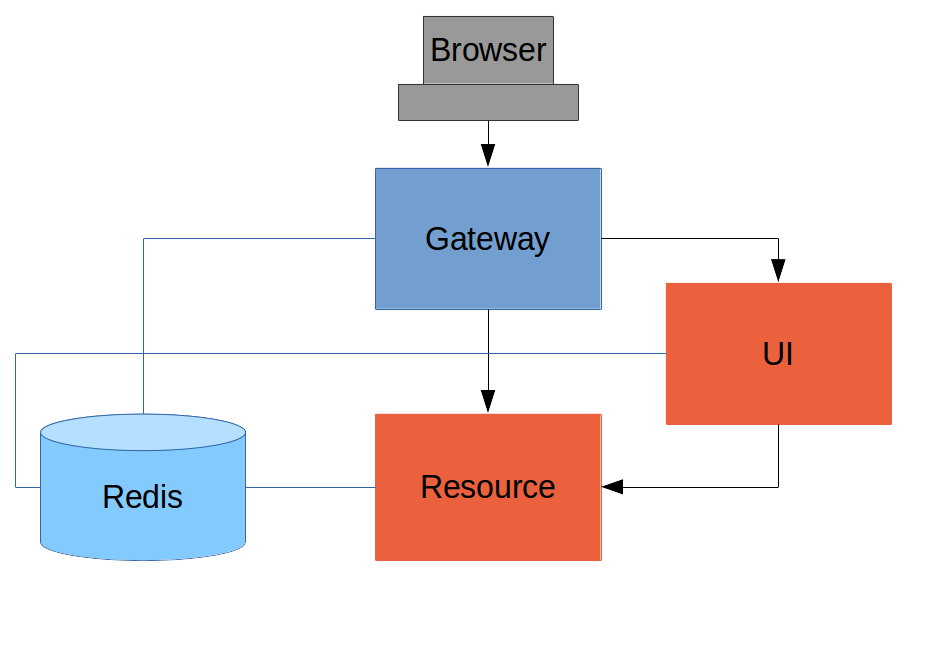
위의 아키텍처에 대해서 간단하게 이야기해보면, 브라우저(Front-end)의 모든 요청은 Gateway 애플리케이션으로 간다. 그리고 이 Gateway 애플리케이션에서 주로 하는 일 중 하나는 인증(authentication)과 관련된 일이다. 여기에서 인증이 성공되고 난 후에는, Spring-Session을 사용해서 Redis에 사용자에 대한 정보가 담긴 세션을 저장한다. 그리고 이어지는 Back-end(UI 애플리케이션, RESOURCE 애플리케이션)에 대한 요청에 대해서는 Redis에 저장된 세션정보를 공유하여 인증을 통과하도록 구현한다.
실제 레퍼런스에서는 AngularJS를 사용하였고, 쿠키를 사용해서 사용자 인증을 진행했다. 하지만 여기에서는 간단하게 curl로 테스트를 진행하기 위해 Spring Session REST를 사용할 것이고, AngularJS는 사용하지 않을 것이다.
1. RESOURCE 애플리케이션 만들기
요청한 데이터를 전달해주기 위한 역할을 하는 RESOURCE 애플리케이션을 만들기 위해서, 새로운 모듈(새로운 프로젝트)을 만들어준다. IntelliJ와 Spring Initializr를 사용했다. Spring Initializr를 통해서 Security, Session, Web, Redis, Lombok를 선택해줬다.
생성된 pom.xml은 아래와 같다.
  <dependencies>
    <dependency>
      <groupId>org.springframework.boot</groupId>
      <artifactId>spring-boot-starter-redis</artifactId>
    </dependency>
    <dependency>
      <groupId>org.projectlombok</groupId>
      <artifactId>lombok</artifactId>
      <version>1.16.6</version>
    </dependency>
    <dependency>
      <groupId>org.springframework.boot</groupId>
      <artifactId>spring-boot-starter-security</artifactId>
    </dependency>
    <dependency>
      <groupId>org.springframework.session</groupId>
      <artifactId>spring-session</artifactId>
    </dependency>
    <dependency>
      <groupId>org.springframework.boot</groupId>
      <artifactId>spring-boot-starter-web</artifactId>
    </dependency>

    <dependency>
      <groupId>org.springframework.boot</groupId>
      <artifactId>spring-boot-starter-test</artifactId>
      <scope>test</scope>
    </dependency>
  </dependencies>
완성된 RESOURCE 애플리케이션의 전체적인 구조는 아래와 같으며, 다운받을 수 있도록 Github에 올려 놓았다.

1.1. 테스트를 위한 Controller 만들기
요청한 리소스를 전달해주기 위한 ResourceController를 생성한다. 전체 내용은 아래와 같다.
@RestController
@Slf4j
public class ResourceController {

    @RequestMapping(value = "/")
    public ResponseEntity welcome(){
        return new ResponseEntity("Welcome. RESOURCE SERVER", HttpStatus.OK);
    }

    @RequestMapping(value = "/user", method = RequestMethod.GET)
    public ResponseEntity getUser(Principal user){
        Map<String, Object> map = new LinkedHashMap<String, Object>();
        map.put("name", user.getName());
        map.put("roles", AuthorityUtils.authorityListToSet(((Authentication) user)
                .getAuthorities()));
        return new ResponseEntity(map, HttpStatus.OK);
    }

    @RequestMapping(value = "/user", method = RequestMethod.POST)
    public ResponseEntity postMethodTest(){
        return new ResponseEntity("RESOURCE SERVER. POST METHOD.", HttpStatus.OK);
    }

}
테스트를 위해서 3가지 메소드를 만들었다.
- 인증없이도 모두 접근이 가능한 내용을 테스트 하기 위해서 welcome( ) 메소드를 만들었다.
- GET 요청을 테스트 하기 위해서 getUser(Principal user) 메소드를 만들었고, 인증(로그인)한 유저에 대한 정보를 보여줄 것이다.
- POST 요청을 테스트 하기 위해서 postMethodTest( ) 메소드를 만들었고, 간단하게 메시지만 전달해주는 역할을 한다.
1.2. Spring Session 설정
위에서 말했듯이, 인증된 정보를 Spring Session을 이용해서 Redis에 저장하기 위해 관련 설정을 해준다. 설정에 대한 자세한 내용은 Spring-Session을 참고하면 되고, 간단하게 몇가지만 설명하고 넘어가겠다.
@Configuration
@EnableRedisHttpSession
public class HttpSessionConfig {

    @Bean
    public JedisConnectionFactory connectionFactory() {
        return new JedisConnectionFactory();
    }

    @Bean
    public HttpSessionStrategy httpSessionStrategy() {
        return new HeaderHttpSessionStrategy();
    }

}
-
@EnableRedisHttpSession:Filter를 구현한springSessionRepositoryFilter라는 이름의 Spring Bean을 생성한다. 이 필터는 HttpSession 구현체를 Spring Session 으로 교체하는 역할을 하고, 이 Spring Session은 Redis에 저장된다. -
connectionFactory( ) : RedisConnectionFactory를 생성해서 Spring Session을 Redis서버와 연결시킨다.
-
HeaderHttpSessionStrategy( ) : 기본적으로 Session에 대한 정보를 전달하기 위해서 쿠키를 사용하는데, HttpSession을 커스터마이징해서 Http Header를 사용해서 Session 정보를 전달하도록 한다.
production 환경에서는 아래의 내용을 설정파일(application.yml)에 추가하여 접속 정보를 변경할 수 있다.
spring:
  redis:
    host: localhost
    port: secret
    password: 6379
1.3. Spring Security 설정
”/” 요청에 대해서는 모두 접근이 가능하도록 설정을 하고, 나머지 요청에 대해서는 “USER” 권한이 있는 사용자들만 접근이 가능하도록 설정해준다.
@Configuration
public class SecurityConfig extends WebSecurityConfigurerAdapter {

    @Override
    protected void configure(HttpSecurity http) throws Exception {

        http
                .httpBasic()
            .and()
                .csrf().disable()
                .authorizeRequests()
                .antMatchers( "/").permitAll()
                .anyRequest().hasRole("USER");

    }

}
1.4. 스프링 설정파일(application.yml) 생성
server:
  port: 9000
security:
  sessions: never
-
server.port: 간단히 말하면 애플리케이션을 9000번 포트로 실행하겠다는 내용이고, 조금 더 자세하게 설명하자면 이 RESOURCE 애플리케이션으로 들어오는 Http요청을 listen하는 포트를 9000번으로 사용하겠다는 내용이다(어차피 같은 의미). -
security.sessions: 이 설정을 never로 해주면, 이 RESOURCE 애플리케이션에서는 세션을 절대 생성하지 않는다. 대신에 이미 생성된 세션이 있다면(우리는 gateway에서 인증과 관련된 처리를 하고, 세션을 생성할 예정이므로) 이미 생성된 그 세션을 가져다 사용하라는 의미이다.
1.5. Redis 설치하기
Spring Session을 저장하기 위한 저장소로 Redis를 설치한다. http://redis.io/download에 설치 방법이 잘 나와있다.
간단하게 명령어 몇가지만 정리해보자면 src 내에서
- 실행 : $ redis-server
- 조회 : $ redis-cli keys ‘*’
-
전체삭제 : $ redis-cli keys ‘*’ xargs redis-cli del
정도 이다.
2. UI 애플리케이션 ADMIN 애플리케이션 만들기
원래는 AngularJS를 사용해서 UI 애플리케이션을 만드는 내용이 있었으나, 관련 내용을 생략하고 ADMIN 애플리케이션을 만들어서 대체하려고 한다(레퍼런스 뒤에 부분에도 ADMIN 애플리케이션을 만들어서 추가하는 부분이 나온다). ADMIN 애플리케이션의 역할은 RESOURCE 애플리케이션과 마찬가지로 요청에 대한 리소스를 전달해주지만, ADMIN 권한이 있는 사용자만 접근이 가능하도록 한다. 대부분의 기능은 RESOURCE 애플리케이션과 같고, Controller에 해당하는 내용만 조금 다르다.
Spring Initializr를 통해서 Security, Session, Web, Redis, Lombok를 선택하여 새로운 모듈을 만들어준다.
생성된 pom.xml은 아래와 같다.
  <dependencies>
    <dependency>
      <groupId>org.springframework.boot</groupId>
      <artifactId>spring-boot-starter-redis</artifactId>
    </dependency>
    <dependency>
      <groupId>org.projectlombok</groupId>
      <artifactId>lombok</artifactId>
      <version>1.16.6</version>
    </dependency>
    <dependency>
      <groupId>org.springframework.boot</groupId>
      <artifactId>spring-boot-starter-security</artifactId>
    </dependency>
    <dependency>
      <groupId>org.springframework.session</groupId>
      <artifactId>spring-session</artifactId>
    </dependency>
    <dependency>
      <groupId>org.springframework.boot</groupId>
      <artifactId>spring-boot-starter-web</artifactId>
    </dependency>

    <dependency>
      <groupId>org.springframework.boot</groupId>
      <artifactId>spring-boot-starter-test</artifactId>
      <scope>test</scope>
    </dependency>
  </dependencies>
완성된 ADMIN 애플리케이션의 전체적인 구조는 아래와 같으며, 다운받을 수 있도록 Github에 올려 놓았다.

2.1. 테스트를 위한 Controller 만들기
요청한 리소스를 전달해주기 위한 AdminController를 생성한다. GET, POST 요청을 테스트하기 위해서 간단하게 만들었고, 전체 내용은 아래와 같다.
@RestController
public class AdminController {

    @RequestMapping(value = "/", method = RequestMethod.GET)
    public ResponseEntity welcome(){
        return new ResponseEntity("Welcome. ADMIN SERVER", HttpStatus.OK);
    }

    @RequestMapping(value = "/time", method = RequestMethod.POST)
    public ResponseEntity getTime(){
        return new ResponseEntity(LocalDateTime.now(), HttpStatus.OK);
    }

}
2.2. Spring Session 설정
위의 1.2. Spring Session 설정의 내용을 참고하면 된다.
@Configuration
@EnableRedisHttpSession
public class HttpSessionConfig {

    @Bean
    public JedisConnectionFactory connectionFactory() {
        return new JedisConnectionFactory();
    }

    @Bean
    public HttpSessionStrategy httpSessionStrategy() {
        return new HeaderHttpSessionStrategy();
    }

}
2.3. Spring Security 설정
@Configuration
public class SecurityConfig extends WebSecurityConfigurerAdapter {

    @Override
    protected void configure(HttpSecurity http) throws Exception {
        http
                .httpBasic()
            .and()
                .csrf().disable()
                .authorizeRequests()
                .anyRequest().hasRole("ADMIN");
    }

}
2.4. 스프링 설정파일(application.yml) 생성
server:
  port: 8089
security:
  sessions: never
3. API Gateway 만들기
드디어 이번 글을 정리하는 가장 큰 목적인 API Gateway 이다. 여기서 만드는 수준의 API Gateway 패턴은 수박겉핥기 수준이지만, 어떤 개념인지, Spring-Cloud를 사용해서 어떻게 쉽게 구현할 수 있는지(실제로 사용하기 위해선 턱 없이 부족하지만..)에 대해 맛보는 것만으로 만족하려고 한다.
우선 Spring Initializr를 통해서 Security, Session, Web, Redis, Zuul, Lombok를 선택하여 새로운 모듈을 만들어준다.
생성된 pom.xml은 아래와 같다.
  <dependencies>
    <dependency>
      <groupId>org.springframework.cloud</groupId>
      <artifactId>spring-cloud-starter-zuul</artifactId>
    </dependency>
    <dependency>
      <groupId>org.springframework.boot</groupId>
      <artifactId>spring-boot-starter-redis</artifactId>
    </dependency>
    <dependency>
      <groupId>org.projectlombok</groupId>
      <artifactId>lombok</artifactId>
      <version>1.16.6</version>
    </dependency>
    <dependency>
      <groupId>org.springframework.boot</groupId>
      <artifactId>spring-boot-starter-security</artifactId>
    </dependency>
    <dependency>
      <groupId>org.springframework.session</groupId>
      <artifactId>spring-session</artifactId>
    </dependency>
    <dependency>
      <groupId>org.springframework.boot</groupId>
      <artifactId>spring-boot-starter-web</artifactId>
    </dependency>

    <dependency>
      <groupId>org.springframework.boot</groupId>
      <artifactId>spring-boot-starter-test</artifactId>
      <scope>test</scope>
    </dependency>
  </dependencies>
완성된 Gateway 애플리케이션의 전체적인 구조는 아래와 같으며, 다운받을 수 있도록 Github에 올려 놓았다.

3.1. API Gateway로 만들기
이 애플리케이션을 API Gateway로 만들어주기 위해서 GatewayApplication.java에 @EnableZuulProxy 애노테이션을 추가해준다. 이 Zuul Proxy는 Netflix OSS 중에서 Proxy server 역할을 하는 모듈이다.
@SpringBootApplication
@EnableZuulProxy
public class GatewayApplication {

  public static void main(String[] args) {
    SpringApplication.run(GatewayApplication.class, args);
  }
}
3.2. 스프링 설정파일(application.yml) 생성
zuul:
  routes:
    resource:
      url: http://localhost:9000
    admin:
      url: http://localhost:8089
security:
  sessions: always
이것은 /resource/** 의 요청을 외부서버(애플리케이션)인 localhost:9000의 경로로 맵핑시켜주는 작업이다. 마찬가지로, /admin/** 에 해당하는 요청에 대해서는 localhost:8089로 매핑시켜준다. 그리고 인증을 위해서 항상 HttpSession을 생성시키기 위해서 security.sessions을 always로 설정해주었다.
3.3. Controller 만들기
GET, POST 요청을 테스트하기 위한 Controller를 생성한다.
@RestController
public class GatewayController {

    @RequestMapping(value = "/", method = RequestMethod.GET)
    public ResponseEntity welcome(){
        return new ResponseEntity("Welcome. GATEWAY SERVER.", HttpStatus.OK);
    }

    @RequestMapping(value = "/users", method = RequestMethod.POST)
    public ResponseEntity adminCreate(){
        // TODO : 새로운 ADMIN을 등록하는 내용을 추가한다
        return new ResponseEntity("success.", HttpStatus.OK);
    }
}
3.4. Spring Session 설정
위에서 했던 것과 똑같이 설정해준다.
@Configuration
@EnableRedisHttpSession
public class HttpSessionConfig {

    @Bean
    public JedisConnectionFactory connectionFactory() {
        return new JedisConnectionFactory();
    }

    @Bean
    public HttpSessionStrategy httpSessionStrategy() {
        return new HeaderHttpSessionStrategy();
    }

}
3.5. Spring Security 설정
@Configuration
public class SecurityConfig extends WebSecurityConfigurerAdapter {

    @Override
    protected void configure(HttpSecurity http) throws Exception {

        http
                .httpBasic()
            .and()
                .csrf().disable()
                .authorizeRequests()
                .antMatchers("/", "/resource").permitAll()
                .antMatchers("/admin/**").hasRole("ADMIN")
                .anyRequest().authenticated();

    }

    @Override
    protected void configure(AuthenticationManagerBuilder auth) throws Exception {
        auth.inMemoryAuthentication()
                .withUser("user").password("password").roles("USER")
            .and()
                .withUser("admin").password("admin").roles("USER", "ADMIN");

    }

}
- gateway의 “/”와 RESOURCE 애플리케이션의 “/” 요청에는 권한이 없어도 모두 접근 가능하도록 했다.
- “/admin” 으로 시작되는 요청에 대해서는 ADMIN 권한을 가진 사용자만 접근이 가능하도록 설정했다.
- 테스트할 계정을 만들었다.
4. 테스트
우선 1.5. Redis 설치하기를 참고하여 Redis를 실행시킨다.
그리고 각각 $ mvn spring-boot:run 을 통해서 애플리케이션을 실행시켜준다(다른 방법으로 실행해도 상관없다).
4.1. 인증되지 않은 상태에서 요청 테스트
먼저 $ redis-cli keys '*' 명령어를 통해서 현재 Redis에 저장된 내용이 있는지 확인한다. 아래와 같이 비어있을 것이다.
$ redis-cli keys '*'
(empty list or set)
그리고 Gateway 애플리케이션의 “/” 요청을 테스트해보면 아래와 같이 정상적으로 HttpStatus.OK와 “Welcome. GATEWAY SERVER.” 메시지가 나오는 것을 확인할 수 있다.
$ curl -v http://localhost:8080
* Rebuilt URL to: http://localhost:8080/
*   Trying ::1...
* Connected to localhost (::1) port 8080 (#0)
> GET / HTTP/1.1
> Host: localhost:8080
> User-Agent: curl/7.43.0
> Accept: */*
>
< HTTP/1.1 200 OK
< Server: Apache-Coyote/1.1
< X-Content-Type-Options: nosniff
< X-XSS-Protection: 1; mode=block
< Cache-Control: no-cache, no-store, max-age=0, must-revalidate
< Pragma: no-cache
< Expires: 0
< X-Frame-Options: DENY
< X-Application-Context: application
< Content-Type: text/plain;charset=UTF-8
< Content-Length: 24
< Date: Wed, 01 Jun 2016 07:43:10 GMT
<
* Connection #0 to host localhost left intact
Welcome. GATEWAY SERVER.
그리고, 또 RESOURCE 애플리케이션의 “/” 요청을 테스트해보았고, 아래와 같이 정상적으로 처리되었다.
$ curl -v http://localhost:8080/resource
*   Trying ::1...
* Connected to localhost (::1) port 8080 (#0)
> GET /resource HTTP/1.1
> Host: localhost:8080
> User-Agent: curl/7.43.0
> Accept: */*
>
< HTTP/1.1 200 OK
< Server: Apache-Coyote/1.1
< X-Content-Type-Options: nosniff
< X-XSS-Protection: 1; mode=block
< Cache-Control: no-cache, no-store, max-age=0, must-revalidate
< Pragma: no-cache
< Expires: 0
< X-Frame-Options: DENY
< X-Application-Context: application
< Date: Wed, 01 Jun 2016 07:49:56 GMT
< Content-Type: text/plain;charset=UTF-8
< Transfer-Encoding: chunked
<
* Connection #0 to host localhost left intact
Welcome. RESOURCE SERVER
4.2. USER 권한을 가진 사용자로 인증 후 테스트
먼저, 인증을 진행했다.
$ curl -v http://localhost:8080 -u user:password
* Rebuilt URL to: http://localhost:8080/
*   Trying ::1...
* Connected to localhost (::1) port 8080 (#0)
* Server auth using Basic with user 'user'
> GET / HTTP/1.1
> Host: localhost:8080
> Authorization: Basic dXNlcjpwYXNzd29yZA==
> User-Agent: curl/7.43.0
> Accept: */*
>
< HTTP/1.1 200 OK
< Server: Apache-Coyote/1.1
< X-Content-Type-Options: nosniff
< X-XSS-Protection: 1; mode=block
< Cache-Control: no-cache, no-store, max-age=0, must-revalidate
< Pragma: no-cache
< Expires: 0
< X-Frame-Options: DENY
< X-Application-Context: application
< x-auth-token: 605b1dc8-c804-4973-94a3-06ae17b6f1f9
< Content-Type: text/plain;charset=UTF-8
< Content-Length: 24
< Date: Wed, 01 Jun 2016 07:55:48 GMT
<
* Connection #0 to host localhost left intact
Welcome. GATEWAY SERVER.
그리고, 생성된 x-auth-token을 헤더에 설정해주고 RESOURCE 애플리케이션의 “/user” 에 요청을 했다.
$ curl -v http://localhost:8080/resource/user -H “x-auth-token: 605b1dc8-c804-4973-94a39”
*   Trying ::1...
* Connected to localhost (::1) port 8080 (#0)
> GET /resource/user HTTP/1.1
> Host: localhost:8080
> User-Agent: curl/7.43.0
> Accept: */*
> x-auth-token: 605b1dc8-c804-4973-94a3-06ae17b6f1f9
>
< HTTP/1.1 200 OK
< Server: Apache-Coyote/1.1
< X-Content-Type-Options: nosniff
< X-XSS-Protection: 1; mode=block
< Cache-Control: no-cache, no-store, max-age=0, must-revalidate
< Pragma: no-cache
< Expires: 0
< X-Frame-Options: DENY
< X-Application-Context: application
< Date: Wed, 01 Jun 2016 07:56:58 GMT
< Content-Type: application/json;charset=UTF-8
< Transfer-Encoding: chunked
<
* Connection #0 to host localhost left intact
{"name":"user","roles":["ROLE_USER"]}
POST 요청도 테스트해보았다.
$ curl -v http://localhost:8080/resource/user -H “x-auth-token: 605b1dc8-c804-4973-94a3-06ae17b6f1f9” -X POST
*   Trying ::1...
* Connected to localhost (::1) port 8080 (#0)
> POST /resource/user HTTP/1.1
> Host: localhost:8080
> User-Agent: curl/7.43.0
> Accept: */*
> x-auth-token: 605b1dc8-c804-4973-94a3-06ae17b6f1f9
>
< HTTP/1.1 200 OK
< Server: Apache-Coyote/1.1
< X-Content-Type-Options: nosniff
< X-XSS-Protection: 1; mode=block
< Cache-Control: no-cache, no-store, max-age=0, must-revalidate
< Pragma: no-cache
< Expires: 0
< X-Frame-Options: DENY
< X-Application-Context: application
< Date: Wed, 01 Jun 2016 07:58:02 GMT
< Content-Type: text/plain;charset=UTF-8
< Transfer-Encoding: chunked
<
* Connection #0 to host localhost left intact
RESOURCE SERVER. POST METHOD.
redis-cli keys '*' 명령어로 Redis 저장소를 확인했더니, 정상적으로 Session이 저장되어있는 것을 볼 수 있었다.
$ redis-cli keys ‘*’
1) "spring:session:sessions:605b1dc8-c804-4973-94a3-06ae17b6f1f9"
2) "spring:session:expirations:1464769740000"
USER 권한을 가지고 있지만, ADMIN 애플리케이션의 “/time”을 요청해보았다.
$ curl -v http://localhost:8080/admin/time -H “x-auth-token: 605b1dc8-c804-4973-94a3-06ae17b6f1f9” -X POST
Trying ::1... -X POST
* Connected to localhost (::1) port 8080 (#0)
> POST /admin/time HTTP/1.1
> Host: localhost:8080
> User-Agent: curl/7.43.0
> Accept: */*
> x-auth-token: 605b1dc8-c804-4973-94a3-06ae17b6f1f9
>
< HTTP/1.1 403 Forbidden
< Server: Apache-Coyote/1.1
< X-Content-Type-Options: nosniff
< X-XSS-Protection: 1; mode=block
< Cache-Control: no-cache, no-store, max-age=0, must-revalidate
< Pragma: no-cache
< Expires: 0
< X-Frame-Options: DENY
< Content-Type: application/json;charset=UTF-8
< Transfer-Encoding: chunked
< Date: Wed, 01 Jun 2016 08:02:18 GMT
<
* Connection #0 to host localhost left intact
{"timestamp":1464768138007,"status":403,"error":"Forbidden","message":"Access is denied","path":"/admin/time"}
로그아웃 후 Session이 정상적으로 삭제되었는지 확인해보았다.
$ curl -v http://localhost:8080/logout -H “x-auth-token: 605b1dc8-c804-4973-94a3-06ae17b6f1f9”
$ redis-cli keys ‘*’
1) "spring:session:expirations:1464769980000"
4.3. ADMIN 권한을 가진 사용자로 인증 후 테스트
ADMIN권한을 가진 계정으로 인증을 진행하고, ADMIN 애플리케이션의 “/time” 요청을 재시도 해보았다.
$ curl -v http://localhost:8080/ -u admin:admin
$ curl -v http://localhost:8080/admin/time -H “x-auth-token: c0f59591-addb-489f-ba55-c1a32e81a0a2” -X POST
*   Trying ::1...
* Connected to localhost (::1) port 8080 (#0)
> POST /admin/time HTTP/1.1
> Host: localhost:8080
> User-Agent: curl/7.43.0
> Accept: */*
> x-auth-token: c0f59591-addb-489f-ba55-c1a32e81a0a2
>
< HTTP/1.1 200 OK
< Server: Apache-Coyote/1.1
< X-Content-Type-Options: nosniff
< X-XSS-Protection: 1; mode=block
< Cache-Control: no-cache, no-store, max-age=0, must-revalidate
< Pragma: no-cache
< Expires: 0
< X-Frame-Options: DENY
< X-Application-Context: application
< Date: Wed, 01 Jun 2016 08:12:12 GMT
< Content-Type: application/json;charset=UTF-8
< Transfer-Encoding: chunked
<
* Connection #0 to host localhost left intact
{"year":2016,"month":"JUNE","dayOfMonth":1,"dayOfWeek":"WEDNESDAY","dayOfYear":153,"monthValue":6,"hour":17,"minute":12,"second":11,"nano":961000000,"chronology":{"id":"ISO","calendarType":"iso8601"}}
5. 정리
Spring Security and Angular JS 레퍼런스에 나온대로 Spring Cloud의 Zuul Proxy를 사용해서 간단한 API Gateway 패턴을 따라해본 내용을 잊어먹기 전에 정리해보았다. Spring Cloud를 사용해서 MSA를 구현하기에는 턱없이 부족한 내용이고, 제대로 이해하지 못한 부분이나 틀린 부분이 있을 수 있지만, 오랜만에 흥미로운 부분을 건드려본 것 같다. 혹시 나중에 기회가 된다면 조금 더 자세하게 다뤄봐야겠다.